Tag: Apache

  • Excellent Tricks For Redirection A Codes Collection

    Ultimate Guide to URL Redirection: Code Snippets and Best Practices (2023 Updated)

    Excellent Tricks For Redirection : Redirecting URLs is a crucial task for website owners, whether you’re migrating to a new domain, restructuring your site, or ensuring a seamless user experience. This guide provides updated code snippets and best practices for implementing redirections using HTML, JavaScript, Apache, Nginx, and PHP. We’ve also added new options and enhancements to ensure your redirections are efficient, SEO-friendly, and user-centric.


    Why URL Redirection Matters

    URL redirection is essential for:

    • SEO Preservation: Maintaining search engine rankings when changing URLs.
    • User Experience: Ensuring visitors land on the correct page.
    • Traffic Management: Redirecting traffic from old pages to new ones.
    • Security: Protecting against phishing and broken links.

    HTML and JavaScript Redirection

    1. Simple HTML + JavaScript Redirect

    This method uses both HTML meta tags and JavaScript for immediate redirection.

    <!DOCTYPE HTML>
    <html lang="en-US">
        <head>
            <meta charset="UTF-8">
            <meta http-equiv="refresh" content="0; url=https://netnaps.com">
            <script type="text/javascript">
                window.location.href = "https://netnaps.com";
            </script>
            <title>Redirecting to Netnaps.com</title>
        </head>
        <body>
            <!-- Fallback for Non-JavaScript Users -->
            If you are not redirected automatically, follow this <a href='https://netnaps.com'>link to NETNAPS</a>.
        </body>
    </html>

    2. JavaScript Fallback for Non-JavaScript Users

    This snippet ensures redirection even if JavaScript is disabled.

    <script>
        window.location.replace("https://netnaps.com");
    </script>
    
    <noscript>
        <a href="https://netnaps.com">Click here if you are not redirected automatically.</a>
    </noscript>

    3. Delayed Redirection with Meta Tag

    Use this for a delayed redirect (e.g., 5 seconds).

    <meta http-equiv="refresh" content="5; url=https://netnaps.com/" />

    4. INIT Function with HTML Redirection

    This method uses JavaScript’s onload event to trigger redirection.

    <!DOCTYPE html>
    <html>
        <head>
            <title>Redirect Example</title>
            <script>
                function init() {
                    window.location.href = "https://netnaps.com";
                }
            </script>
        </head>
        <body onload="init()">
        </body>
    </html>

    Apache Server .htaccess Redirections

    1. Permanent Redirect 301 (Non-www to www)

    Redirects non-www to www for better consistency.

    # Redirect non-www to www
    RewriteEngine On
    RewriteCond %{HTTP_HOST} !^www\.
    RewriteRule ^(.*)$ https://www.%{HTTP_HOST}/$1 [R=301,L]

    2. Redirect www to Non-www

    Redirects www to non-www for a cleaner URL structure.

    RewriteCond %{HTTP_HOST} ^www\.(.*)$ [NC]
    RewriteRule ^(.*)$ https://%1/$1 [R=301,L]

    3. Redirect www Domain with Folder/Subdirectory

    Redirects a domain with a specific folder or subdirectory.

    RewriteEngine on
    RewriteBase /
    RewriteCond %{HTTP_HOST} netnaps.com [NC]
    RewriteRule ^(.*)$ https://netnaps.com/directory/index.html [R=301,NC]

    4. Redirect Old Domain to New Domain with Query String

    Redirects an old domain to a new one while preserving the query string and path.

    Options +FollowSymLinks
    RewriteEngine On
    RewriteRule ^(.*) https://netnaps.com%{REQUEST_URI} [R=302,NC]

    5. Redirect Entire Website

    Redirects all pages from one domain to another.

    Redirect 301 / https://netnaps.com/

    6. Redirect a Specific Page

    Redirects a particular page to a new location.

    Redirect 301 /index.php https://netnaps.com/blog

    7. Redirect Site to a Folder/Directory

    Redirects the entire site to a subfolder.

    Redirect 301 / http://www.domain.com/subfolder/

    8. HTML to PHP File Redirection

    Redirects all .html files to their .php equivalents.

    RedirectMatch 301 (.*)\.html$ https://netnaps.com$1.php

    9. Redirect Old Domain to New Domain

    Redirects all traffic from an old domain to a new one.

    RewriteEngine on
    RewriteBase /
    RewriteRule (.*) http://www.newdomain.com/$1 [R=301,L]

    Nginx Redirects

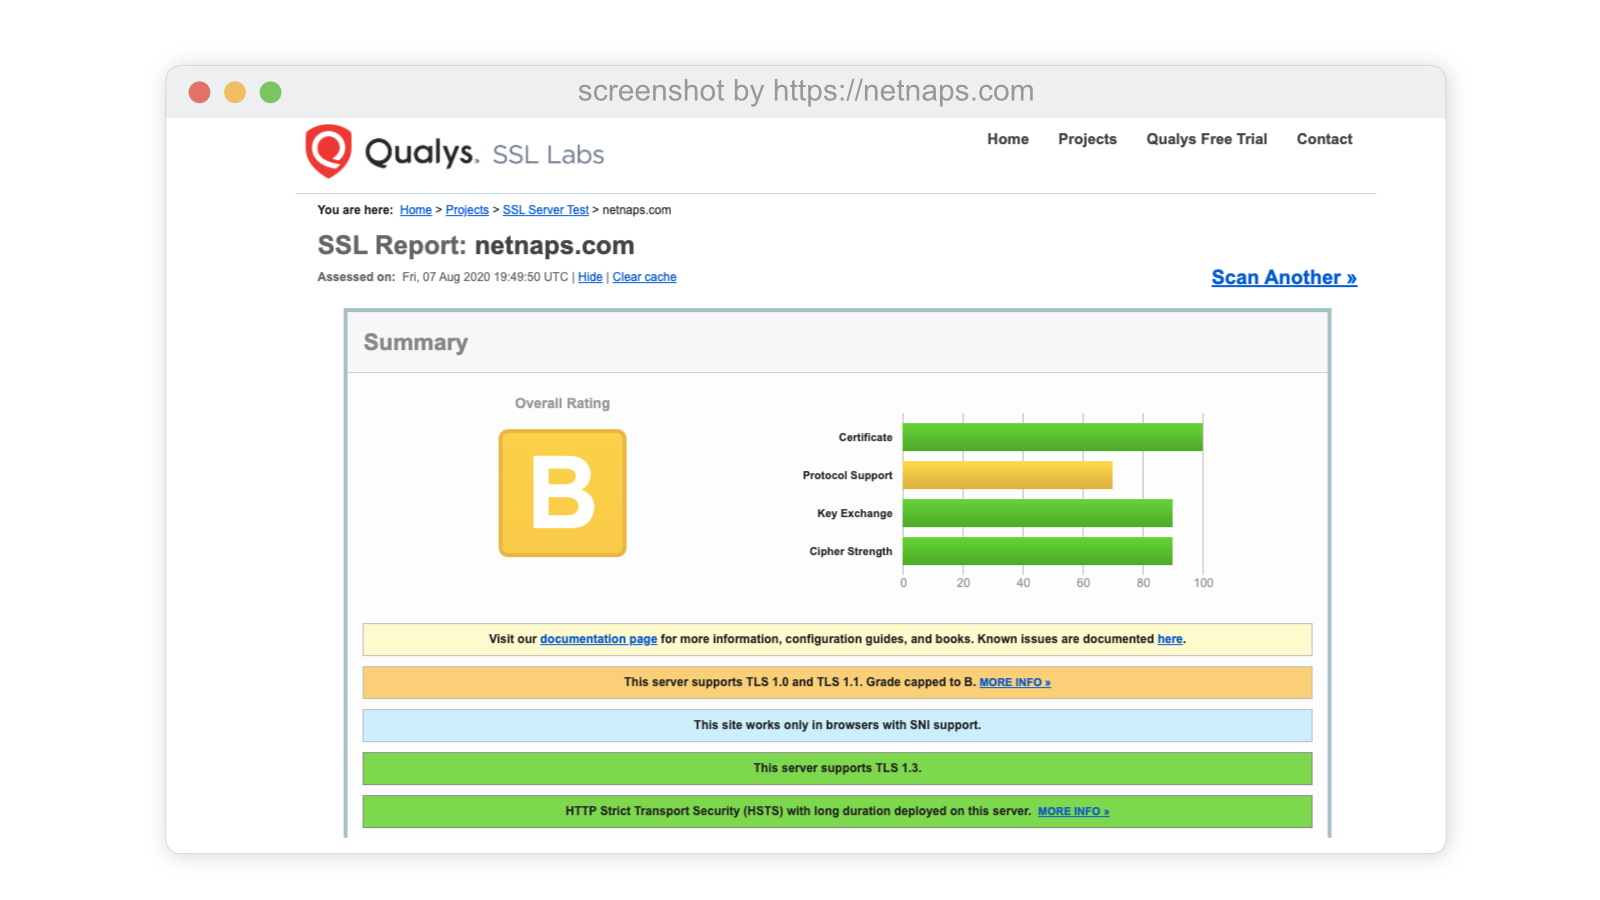
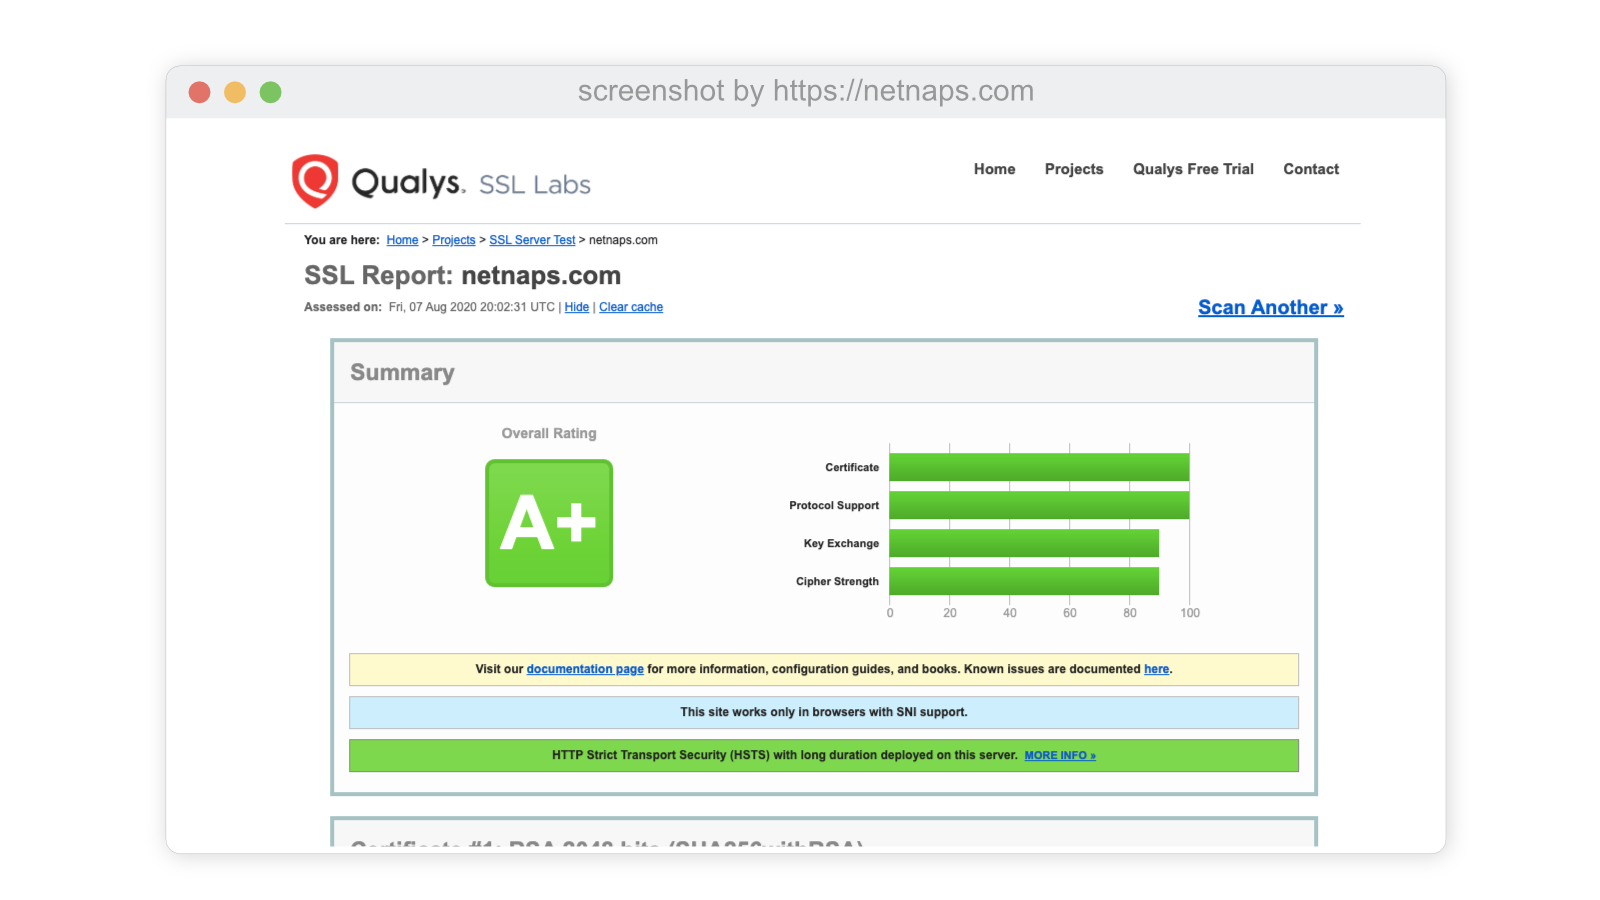
    1. Redirect All HTTP Requests to HTTPS

    Ensures all traffic is redirected to HTTPS.

    server {
      listen [::]:80;
      listen      80;
      server_name netnaps.com www.netnaps.com;
    
      # Redirect all non-https requests
      rewrite ^ https://$host$request_uri? permanent;
    }

    2. Alternative Nginx HTTPS Redirect

    Another method for redirecting HTTP to HTTPS.

    server {
      listen              80;
      listen              [::]:80;
      server_name         netnaps.com www.netnaps.com;
      location '/var/www/netnaps' {
        default_type "text/plain";
        root        /tmp/dir;
      }
    
      location / {
        return              301 https://$server_name$request_uri;
      }
    }

    PHP Redirects

    1. Basic PHP Redirection

    Redirects users using PHP’s header function.

    <?php
        header("HTTP/1.1 301 Moved Permanently");
        header("Location: https://netnaps.com");
        exit();
    ?>

    2. Conditional PHP Redirection

    Redirects users based on specific conditions.

    <?php
        if ($_SERVER['HTTP_HOST'] == 'olddomain.com') {
            header("Location: https://netnaps.com");
            exit();
        }
    ?>

    Best Practices for URL Redirection

    1. Use 301 for Permanent Redirects: Ensures SEO value is passed to the new URL.
    2. Test Your Redirects: Use tools like Redirect Checker to verify functionality.
    3. Avoid Redirect Chains: Ensure direct redirection to the final destination.
    4. Update Internal Links: Replace old URLs with new ones to minimize reliance on redirects.
    5. Monitor Performance: Use tools like Google Search Console to track redirect errors.

    New Enhancements and Tools

    • Cloudflare Redirects: Use Cloudflare’s page rules for serverless redirection.
    • WordPress Plugins: Plugins like Redirection or Simple 301 Redirects simplify the process.
    • Edge Side Includes (ESI): For dynamic content redirection in CDN environments.
    • Automated Redirect Mapping: Tools like Screaming Frog can automate bulk redirects.

    Conclusion

    URL redirection is a powerful tool for maintaining SEO, improving user experience, and managing website changes. With the updated code snippets and best practices provided in this guide Excellent Tricks For Redirection, you can implement redirections efficiently and effectively. Whether you’re using HTML, JavaScript, Apache, Nginx, or PHP, these solutions will ensure your website runs smoothly.


    Have you implemented URL redirections on your website? Share your experience or ask questions in the comments below! For more advanced tips and tools, explore our website management resources.


  • Getting an A+ SSL Rating on Nginx Apache Server

    Saturday 8 August 15:18

    Getting A+ SSL Rating on Apache

    Getting an A+ SSL Rating on Lightsail is just a 5-minute task,

    It’s only turning off old versions of SSL from your configuration file.

    Getting a free SSL is well documented by the lightsail team here, in a 9 Step Tutorial, if you have not got an SSL please get one,

    SSL improves your SEO, maintains trust for the visitor and is a must for any website in 2020.

    After reading this post from Qualys, searching some more articles

    I could make out that getting A+ SSL rating and not allowing the previous versions of SSL on a website or a blog is both good for your SEO Strategy and Security part.

    So, here it is Get your site checked here on the Qualys Tool For SSL it’s Free!

    Here is a screenshot of a test when I just started this blog and was continuously improving on its security, SEO, and everything I could do for achieving a simple, secure and a pro website.

    Getting the same as an A+ was just a 5 minutes task, from start to finish on a lightsail hosted website, using apache server, with bitnami image of wordpress.

    Here’s how I got this from B to A+

    Just head over to your SSH Window and start with :

    sudo nano /opt/bitnami/apache2/conf/bitnami/bitnami.conf

    Soon you are into editing the bitnami.conf file, so we have to just turn off the old versions of SSL

    Find this line with “CTRL+W”, or whatever that line reads near SSL Protocol

    SSLProtocol all -SSLv2 -SSLv3

    Change the same to

    SSLProtocol TLSv1.2

    CTRL+O to write out and CTRL+X to Exit

    Restart the Apache

    sudo /opt/bitnami/ctlscript.sh restart

    Getting A+ SSL Rating Nginx Server


    sudo nano /etc/nginx/nginx.conf

    Change the lines that start with #SSL Settings to Exactly the code below this would also add the session timeout and Strict Security Header :

        ##
    
        ssl_protocols TLSv1.2 TLSv1.3; # Dropping SSLv3, ref: POODLE
        ssl_prefer_server_ciphers on;
        ssl_session_cache shared:SSL:10m;
        ssl_session_timeout 10m;
        ##

    Once done just restart your server with :

    sudo service nginx reload && sudo service nginx restart

    This gives A+ SSL Rating.

    SSL is a must if you use AMP on your WordPress Blog. , Also here’s a collection of some website testing tools that I keep on updating.

    HSTS Preload on NGINX Server

    add_header Strict-Transport-Security "max-age=63072000; includeSubDomains; preload" always;

    This gives you a HSTS Header on your site, if you use Nginx Server, Enrolling to HSTS list is good for your sites security, this enables browsers to understand that your site is only served on a secured connection.

    You can enrol here for HSTS, First, you need to test on the same link then Enroll the domain.

    HSTS Preload on APACHE Server

    Mod Headers Looks Like :

    First, enable mod headers in your httpd.conf file,

    you can find in the /etc/apache2/httpd.conf :

    LoadModule headers_module modules/mod_headers.so
    

    then simply add the below line in your virtual host’s file.

    <VirtualHost *:443>
    ...
    Header always set Strict-Transport-Security "max-age=63072000; includeSubDomains"
    ...
    </VirtualHost>
  • WordPress SSL on MacOs Step By Step

    WordPress SSL on MacOS: Step-by-Step Guide to Secure Your Localhost

    Securing your WordPress site with SSL on MacOS is essential, even when working on a localhost. SSL (Secure Sockets Layer) encrypts data between your browser and server, ensuring a secure connection. In this guide, we’ll walk you through the steps to install WordPress SSL on MacOS for your localhost environment. By the end, you’ll have a fully secure WordPress setup ready for development or testing.


    Why Install SSL on WordPress Localhost?

    Even though your localhost isn’t publicly accessible, adding SSL on MacOS offers several benefits:

    • Secure Testing: Simulate a live environment with HTTPS for testing plugins, themes, and features.
    • Avoid Mixed Content Warnings: Prevent issues when migrating your site to a live server.
    • Prepare for Production: Ensure your site is production-ready with SSL configured from the start.

    Step 1: Set Up Localhost on MacOS

    Before installing SSL, ensure your localhost environment is set up. If you haven’t done this yet, follow our detailed guide on setting up localhost on MacOS Catalina. This guide covers installing tools like MAMP or Local by Flywheel, which are essential for running WordPress locally.


    Step 2: Generate SSL Certificates

    To enable SSL on MacOS, you’ll need SSL certificates. Here’s how to generate them:

    Using MAMP Pro

    1. Open MAMP Pro and select your WordPress site.
    2. Go to the Hosts tab and click SSL.
    3. Check the box for Enable SSL and generate a self-signed certificate.

    Using Local by Flywheel

    1. Open Local by Flywheel and select your WordPress site.
    2. Click on SSL in the left-hand menu.
    3. Toggle the switch to enable SSL. Local will automatically generate and install the certificates.

    Step 3: Configure WordPress to Use SSL

    Once SSL certificates are generated, configure WordPress to use HTTPS:

    1. Open your WordPress site in a browser.
    2. Log in to the WordPress admin dashboard.
    3. Go to Settings > General.
    4. Update the WordPress Address (URL) and Site Address (URL) to use https:// instead of http://.
    5. Save the changes.

    Step 4: Fix Mixed Content Issues

    After enabling SSL, you may encounter mixed content warnings (HTTP resources on an HTTPS page). Here’s how to fix them:

    1. Install the Really Simple SSL plugin.
    2. Activate the plugin, and it will automatically detect your SSL certificate and fix mixed content issues.
    3. Verify your site by visiting it in a browser. The padlock icon should appear in the address bar.

    Step 5: Test Your SSL Configuration

    To ensure your WordPress SSL on MacOS is working correctly:

    1. Visit your site using https://.
    2. Check for the padlock icon in the browser’s address bar.
    3. Use tools like SSL Labs’ SSL Test (opens in new tab) to validate your SSL configuration.

    Best Practices for SSL on Localhost

    • Use Trusted Tools: Tools like MAMP Pro and Local by Flywheel simplify SSL setup.
    • Regularly Update Certificates: Self-signed certificates may expire. Regenerate them periodically.
    • Test Thoroughly: Ensure all plugins and themes work correctly with HTTPS.

    Final Thoughts

    Installing WordPress SSL on MacOS for your localhost environment is a straightforward process that enhances security and prepares your site for production. By following the steps above, you can ensure a seamless transition to HTTPS and avoid common pitfalls.

    For more detailed instructions on setting up localhost, check out our guide on localhost setup for MacOS Catalina.


    Key Takeaways

    • SSL is essential for secure testing and preparing your WordPress site for production.
    • Tools like MAMP Pro and Local by Flywheel simplify SSL setup on MacOS.
    • Use plugins like Really Simple SSL to fix mixed content issues.
    • Regularly test and update your SSL configuration to ensure security.

    Have you set up WordPress SSL on MacOS? Share your experience or ask questions in the comments below! For more WordPress tips and tutorials, visit Netnaps.

    For more details on setting up localhost, check out our guide on localhost

  • Easy Steps to Install WordPress on Localhost Using macOS: A Beginner’s Guide

    Installing WordPress on your localhost is a fantastic way to build, test, and experiment with websites without needing a live server. Whether you’re learning WordPress, developing a new theme, or testing plugins, running WordPress locally on your macOS is simple and efficient. This step-by-step guide will walk you through the process, even if you’re not a techie. By the end, you’ll have a fully functional WordPress site running on your Mac!


    Why Install WordPress on Localhost?

    1. Offline Development: Work on your website without an internet connection.
    2. Safe Testing: Experiment with themes, plugins, and code without affecting a live site.
    3. Faster Workflow: No need to upload files to a remote server, saving time.
    4. Cost-Effective: No hosting fees required.

    Tools You’ll Need

    To install WordPress on macOS, you’ll need:

    1. MAMP (Mac, Apache, MySQL, PHP): A free tool to set up a local server environment.
    2. WordPress: The latest version of WordPress from wordpress.org.

    Step-by-Step Guide to Install WordPress on macOS

    Follow these easy steps to set up WordPress on your localhost:


    Step 1: Download and Install MAMP

    1. Go to the MAMP website.
    2. Download the free version of MAMP for macOS.
    3. Open the downloaded .pkg file and follow the installation instructions.
    4. Once installed, launch MAMP from your Applications folder.

    Step 2: Start the MAMP Server

    1. Open MAMP and click Start Servers.
    • This will start Apache (web server) and MySQL (database server).
    1. Open your browser and go to:
       http://localhost:8888

    You should see the MAMP welcome page, confirming the server is running.


    Last Step 3 : Create a Database for WordPress

    1. In MAMP, click Open WebStart page or go to:
       http://localhost:8888/phpMyAdmin
    1. Log in to phpMyAdmin (username: root, password: root).
    2. Click Databases at the top.
    3. Enter a name for your database (e.g., wordpress_local) and click Create.

    Step 4: Download and Set Up WordPress

    1. Download the latest version of WordPress from wordpress.org.
    2. Extract the downloaded .zip file.
    3. Rename the extracted folder to your project name (e.g., mywordpresssite).
    4. Move the folder to the MAMP htdocs directory:
       /Applications/MAMP/htdocs/

    Step 5: Configure WordPress

    1. Open your browser and go to:
       http://localhost:8888/mywordpresssite

    Replace mywordpresssite with the name of your folder.

    1. Select your language and click Continue.
    2. On the next screen, click Let’s go.
    3. Enter the following database details:
    • Database Name: The name you created earlier (e.g., wordpress_local).
    • Username: root
    • Password: root
    • Database Host: localhost
    • Table Prefix: Leave as wp_ (or change it if needed).
    1. Click Submit.
    2. If the connection is successful, click Run the installation.

    Step 6: Complete the WordPress Installation

    1. Enter the following details:
    • Site Title: Name of your website (e.g., My Local Site).
    • Username: Choose a username for your WordPress admin.
    • Password: Set a strong password.
    • Your Email: Enter your email address.
    1. Click Install WordPress.
    2. Once the installation is complete, click Log In.
    3. Log in with your username and password.

    Step 7: Access Your Local WordPress Site

    1. Your WordPress site is now live on localhost! You can access it at:
       http://localhost:8888/mywordpresssite
    1. To access the admin dashboard, go to:
       http://localhost:8888/mywordpresssite/wp-admin

    Additional Tips for Running WordPress Locally

    1. Organize Your Projects: Create separate folders in htdocs for each WordPress site.
    2. Use a Code Editor: Use tools like Visual Studio Code or Sublime Text to edit your WordPress files.
    3. Install Themes and Plugins: Experiment with free or premium themes and plugins to customize your site.
    4. Backup Your Site: Use plugins like Duplicator to back up your local site before making major changes.

    Troubleshooting Common Issues

    1. Port Conflict: If port 8888 is already in use, change the port in MAMP settings:
    • Go to Preferences > Ports and set Apache to a different port (e.g., 8080).
    1. Database Connection Error: Double-check your database name, username, and password in wp-config.php.
    2. White Screen of Death: This usually happens due to a plugin or theme conflict. Disable plugins or switch to a default theme.

    Conclusion

    Installing WordPress on localhost using macOS is a straightforward process that opens up endless possibilities for learning and development. With tools like MAMP, you can create a fully functional WordPress site in just a few steps. Whether you’re a beginner or an experienced developer, running WordPress locally is a valuable skill that can save you time and effort.

    Have you set up WordPress on localhost before? Share your experience or ask questions in the comments below!

    NEXT : Check this Guide to Setup SSL on Localhost